
Pinterest got me once again...
I was seeing pins all over my feed of beautiful picture ledges. I had a large blank wall going down my hallway, that was calling me to fill it with pictures. I knew that I was too much of a perfectionist and that Tyson strongly disliked hanging things, to have the patience to hang a gallery wall. Nailing each picture up individually, was a disaster waiting to happen. When I stumbled upon a DIY picture ledge tutorial, I knew I had found my match. It seemed simple enough and within budget. When I say within budget, I mean $15 per shelf. If you were to purchase these shelves they would cost you an arm and a leg, which was something I was not willing to sacrifice.
After the chalkboards, it took me some convincing to get the hubby to tackle another project with me. I am not that handy, so I have to recruit Tyson to be my Tim "The Toolman" Taylor, to make my ideas come to life. The tutorial I pinned seemed easy enough, but had to alter some things to make it work with what tools we had. It took a little more work than I had anticipated, but all the more worth the finished product.
Materials You will Need:
(I made two shelves)
1 - 1x4 @ 8 feet long
(back)
1- 1x3 @ 8 feet long
(bottom)
1 - 1x2 @ 8 feet long
(front)
2 inch nails
nail gun
wood glue
sandpaper
spackling and nail hole filler
2 cans spray paint
You can customize the shelves to whatever length and width you would like. It just so happened to be a bonus that the length I needed was 8 feet. I knew my shelves were going to be in the hallway so I didn't want them sticking out too far.
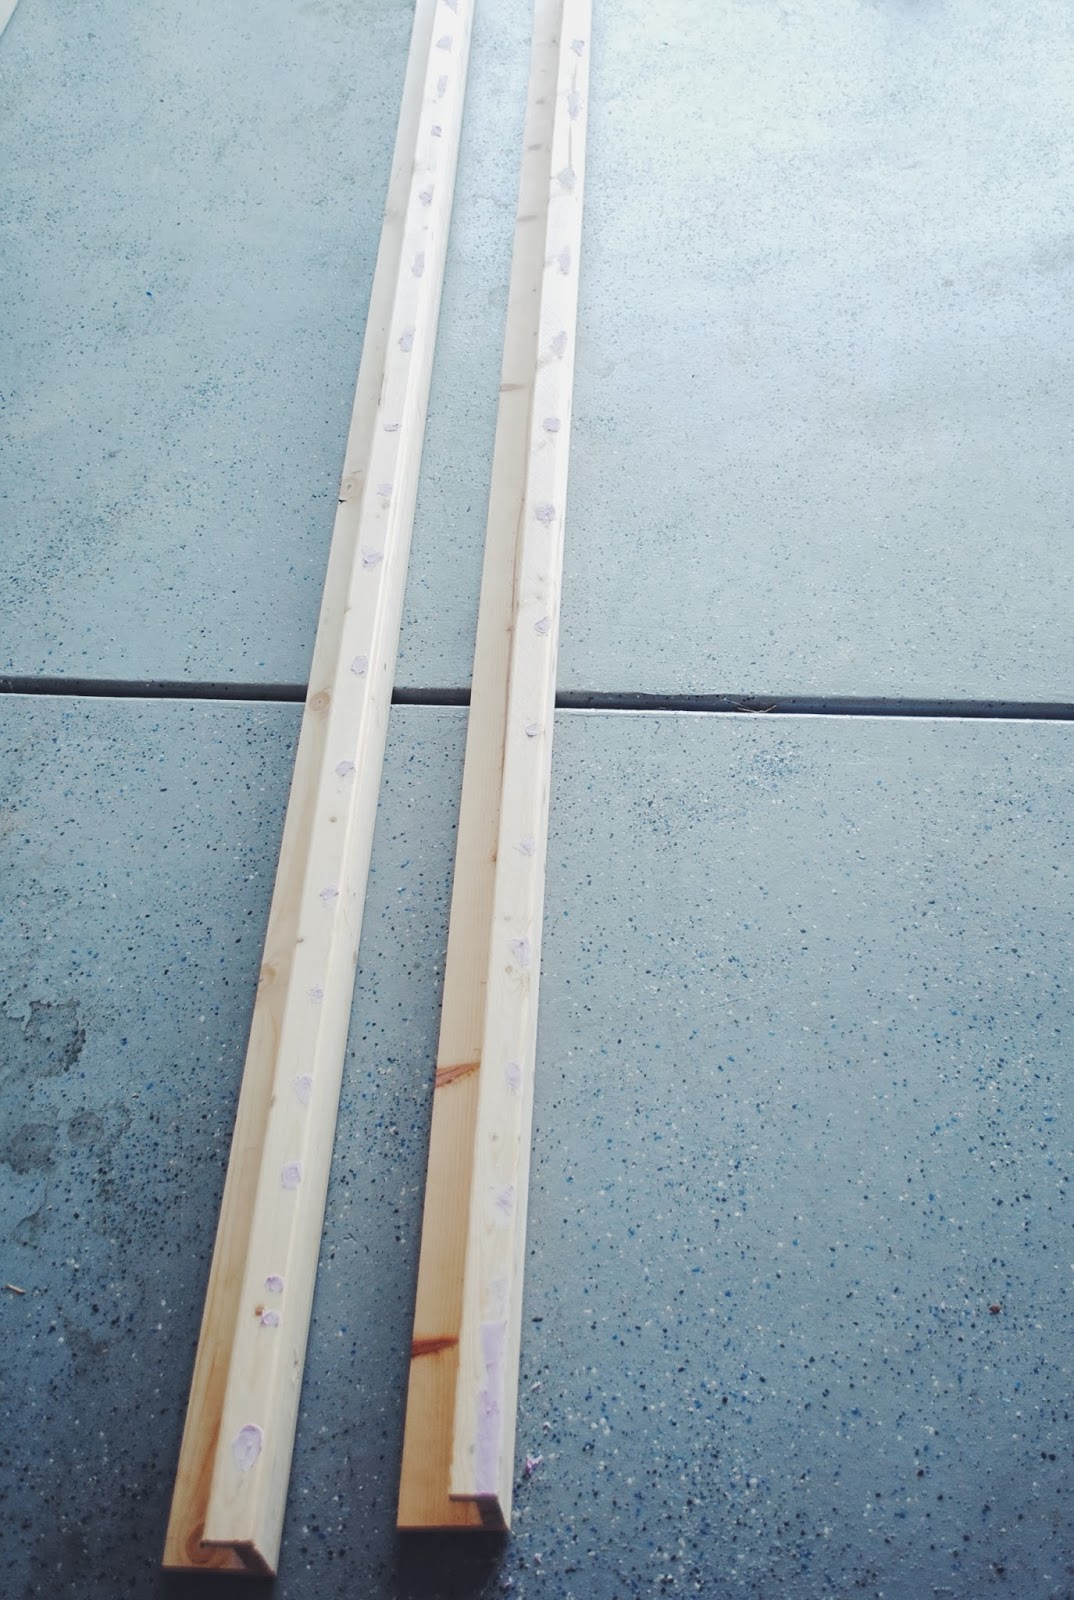
Step One:
Sand the wood until it is smooth.

Step Two:
This is where I recruited Ty and my father-in-law. I don't trust myself with a nail gun. It will defiantly take two people to complete this step. Use wood glue to help hold boards into place before you nail gun them together. Nail the 1x4 (back) piece to the 1x3 (bottom) piece.

^^^ One person can nail, while the other person helps hold the boards in place. ^^^

Step Three:
Glue the 1x2 (front) piece to the 1x3 (bottom) piece.


^^^ Again, you will need another person to help position the wood. ^^^

^^^ Take a step back and admire your shelves. ^^^
Step Four:
Apply spackle to fill in any gaps and nail holes.


^^^ Use your finger to spread spackle. ^^^
Step Five:
Once the spackle has dried, take your sandpaper and sand until smooth. I repeated step four and five until there were no visible holes.

Step Six: (Not Pictured)
Spray paint or stain your wood. I used a white satin finish and love how it turned out. This is a two to three day process. I promise it is worth the wait. I placed my boards on upside down paint buckets. You will want to wait at least 24 hours before spraying your second coat. Once the 24 hours has passed you can rotate your shelves and spray the bottoms.
Step Seven:
Hang your shelves. I again recruited some help! Tyson marked the studs on our wall and then screwed the shelves into them.
(I didn't worry about the screw holes in the shelves, because I knew the pictures would cover them.
Find some picture frames and decorate your ledges.
Thanks to the Harlan Ranch Garage sale, I was able to find some frames for super cheap.
I enjoy walking by my shelves daily and having something on my walls, that were made out of love.


I seriously LOVE these!!! Turned out great. :) Good job!
ReplyDeleteMy Mother has 15 grandchildren and 22 (and no end in sight) great-grandchildren...the photos are so many and often change, this is a wonderful, simple and beautiful way to display her little angels!
ReplyDeleteI love your picture wall!! How high off the ground is the bottom of the bottom ledge from the ground? I'm having a hard time deciding how high off the ground I should hang my bottom ledge. And what is the distance between the two ledges? I would really appreciate the help :) Thank you!!
ReplyDeleteI have scoured many websites, blogs, etc and no one seems to share this info! Was hoping there would be a reply here to guide me.
Deletehttps://www.diyinspired.com/right-height-hang-shelves/
DeleteThank you for the tutorial. I saw someone post pictures on a Facebook group about Craft rooms & Organization tips. She found picture ledges at Ikea to hold her spools of ribbon. I love the look and I figured it would be probably a little cheaper to make them myself. It was suggested I go to Pinterest to find a tutorial so I did and ta-da, here I am!
ReplyDeleteI love that this is doable and I'm looking forward to creating shelves for my ribbon spools. (Just not so wide compared to your 8 foot length, though!!)
I have many more photos and art work than I have wall space to hang them. This idea allows me to rotate my display without damaging the walls with excessive nail holes.
ReplyDeleteI have many more photos and art work than I have wall space to hang them. This idea allows me to rotate my display without damaging the walls with excessive nail holes.
ReplyDeleteI have a long 15+ foot narrow hallway. This is the perfect idea for utilizing it!! ��
ReplyDeleteWOW!! Awesome!
ReplyDeleteHello friends!
ReplyDeleteYou feel the wallpaper of your cell phone is boring? Want to own a unique and exciting background on your phone? I'll introduce you to the list of best cell phone wallpapers you can consider downloading to your phone.
Wallpaper Collection:
https://colorwallpaper.net/hacker-wallpaper/
https://colorwallpaper.net/hulk-wallpaper/
https://colorwallpaper.net/earth-wallpaper/
https://colorwallpaper.net/black-wallpaper/
https://colorwallpaper.net/white-wallpaper/
All wallpapers are free to download. Hopefully some of our updates can bring a whole new look to the worldwide imaging market. To learn more about the latest wallpapers, you can visit the homepage: https://colorwallpaper.net/
Hello
ReplyDeleteMuch cheaper and easier to buy from IKEA for GBP 9 (USD12) for 1.15 metre (45 inch) length.
https://www.ikea.com/gb/en/products/decoration/frames-pictures/mosslanda-picture-ledge-white-art-90292103/
We use them all the time in our shops to display toys and books.
Hope this helps
Paul
June 15, 2019, marks the day when Tyson Fury and Tom Schwarz will face each other. Fury will come on the screen for the first time in 2019. Fans are excited, are you? Want to Watch Tyson Fury vs. Tom Schwarz Live Online? Learn how you can watch it though FastestVPN!
ReplyDeleteThere are many important events took place on this day due to which Muslims call the Jummah day (Jumu’ah)as a holy day
ReplyDeletejumma mubarak
jumma mubarak gif
jumma mubarak wallpapers
Thanks a lot for giving everyone an extraordinarily memorable possiblity to read articles and blog posts from this blog. It can be so sweet and also full of fun for me personally and my office friends to search your site at a minimum 3 times weekly to read through the fresh things you have. And of course, I'm at all times contented with all the excellent opinions you serve. Some 4 ideas on this page are truly the best I have ever had.
ReplyDeletehome & giftware
ReplyDeleteYou can't believe what i just got,… A loan of $ 60,000. I have been looking for a loan for the past 2years until i was referred to a legitimate lender. Though it was not that easy to approve my loan, as you know nothing good comes easy. But I got my loan within 4 hours i got my loan, and before i knew it, the loan was transferred to me. please friends, don't let any body deceive you and scam you for this is real. Contact them via Email: gaincreditloan1@gmail.com OR You can also whatsApp them at: at +1-(901)676-0641 (WhatsApp Only)
Everyone loves what you guys are up too. This type of clever work and exposure! Keep up the good works guys I've added you guys to our blogroll.
ReplyDeletegiftware online shop
Here you can buy Egofine 8x10 Picture Frames 4 PCS - Made of Solid Wood HD Plexiglass for Tabl...
ReplyDeleteamasya
ReplyDeletesinop
çorum
sakarya
van
RV8
bitlis
ReplyDeleteurfa
mardin
tokat
çorum
8A1DO
goruntulu show
ReplyDeleteücretli
LFAZ
denizli evden eve nakliyat
ReplyDeletekars evden eve nakliyat
çorum evden eve nakliyat
kars evden eve nakliyat
malatya evden eve nakliyat
K585YZ
https://istanbulolala.biz/
ReplyDelete6ZLRN
adıyaman evden eve nakliyat
ReplyDeletekastamonu evden eve nakliyat
kırklareli evden eve nakliyat
diyarbakır evden eve nakliyat
ankara evden eve nakliyat
N4İH
düzce evden eve nakliyat
ReplyDeletedenizli evden eve nakliyat
kırşehir evden eve nakliyat
çorum evden eve nakliyat
afyon evden eve nakliyat
QDW
düzce evden eve nakliyat
ReplyDeletedenizli evden eve nakliyat
kırşehir evden eve nakliyat
çorum evden eve nakliyat
afyon evden eve nakliyat
W1FKE
düzce evden eve nakliyat
ReplyDeletedenizli evden eve nakliyat
kırşehir evden eve nakliyat
çorum evden eve nakliyat
afyon evden eve nakliyat
771
D2359
ReplyDeleteAmasya Parça Eşya Taşıma
Mamak Parke Ustası
Tekirdağ Evden Eve Nakliyat
Kripto Para Borsaları
Etlik Boya Ustası
Samsun Şehir İçi Nakliyat
Erzincan Parça Eşya Taşıma
Kayseri Şehir İçi Nakliyat
Ağrı Parça Eşya Taşıma
44425
ReplyDeleteMalatya Evden Eve Nakliyat
Kırşehir Şehirler Arası Nakliyat
Giresun Şehirler Arası Nakliyat
Çanakkale Evden Eve Nakliyat
Çerkezköy Marangoz
Çorum Şehirler Arası Nakliyat
Adıyaman Evden Eve Nakliyat
Çerkezköy Motor Ustası
Tekirdağ Şehir İçi Nakliyat
ACD20
ReplyDeleteYozgat Evden Eve Nakliyat
Siirt Şehir İçi Nakliyat
Karapürçek Boya Ustası
Çankırı Şehirler Arası Nakliyat
buy clenbuterol
Siirt Şehirler Arası Nakliyat
Bingöl Şehirler Arası Nakliyat
Kilis Lojistik
Ünye Koltuk Kaplama
0CEAB
ReplyDeleteAydın Evden Eve Nakliyat
Amasya Evden Eve Nakliyat
Tekirdağ Parke Ustası
İzmir Evden Eve Nakliyat
Karapürçek Fayans Ustası
Çerkezköy Organizasyon
Karapürçek Parke Ustası
Çerkezköy Kurtarıcı
Adıyaman Evden Eve Nakliyat
E3AAE
ReplyDeletereferans kodu %20
0E119
ReplyDeleteKripto Para Üretme Siteleri
Bitcoin Hesap Açma
Paribu Borsası Güvenilir mi
Kripto Para Nasıl Çıkarılır
Bitcoin Giriş Nasıl Yapılır
Binance Madenciliği Nedir
Binance Sahibi Kim
Mexc Borsası Kimin
Paribu Borsası Güvenilir mi
85FD5
ReplyDeleteKripto Para Kazanma
Bitcoin Çıkarma Siteleri
Mexc Borsası Güvenilir mi
Bitcoin Yatırımı Nasıl Yapılır
Bitcoin Kazma Siteleri
Okex Borsası Güvenilir mi
Bitcoin Kazma Siteleri
Kripto Para Kazma
Bitcoin Mining Nasıl Yapılır
34D98
ReplyDeletebinance referans kodu
resimli magnet
resimli magnet
binance referans kodu
binance referans kodu
referans kimliği nedir
resimli magnet
binance referans kodu
referans kimliği nedir
D61F5
ReplyDeleteamiclear
8B7A4
ReplyDeletesivas sesli sohbet odası
adana mobil sesli sohbet
edirne rastgele görüntülü sohbet uygulamaları
tokat canlı görüntülü sohbet odaları
adana ücretsiz sohbet uygulaması
kilis sesli mobil sohbet
mardin ücretsiz görüntülü sohbet uygulamaları
zonguldak bedava sohbet odaları
görüntülü sohbet kızlarla
13AA5
ReplyDeleteizmir ücretsiz görüntülü sohbet
Ağrı Canlı Sohbet Et
Trabzon Görüntülü Sohbet Yabancı
Kırşehir Sohbet Uygulamaları
rastgele görüntülü sohbet
tokat ücretsiz görüntülü sohbet uygulamaları
çanakkale yabancı görüntülü sohbet
Kırklareli Rastgele Sohbet
edirne rastgele canlı sohbet
8348E
ReplyDeletesivas en iyi sesli sohbet uygulamaları
Ardahan Mobil Sohbet Chat
aksaray telefonda rastgele sohbet
muş ücretsiz görüntülü sohbet uygulamaları
mardin sesli sohbet mobil
rize canlı sohbet ücretsiz
rastgele sohbet odaları
rastgele sohbet
konya canli goruntulu sohbet siteleri
1B0CE
ReplyDeleteAfyon Canlı Sohbet
bedava sohbet siteleri
Tekirdağ Ücretsiz Sohbet Odaları
tunceli canlı görüntülü sohbet siteleri
Adana Mobil Sesli Sohbet
ücretsiz sohbet odaları
Karaman En İyi Rastgele Görüntülü Sohbet
Denizli Parasız Sohbet
canlı görüntülü sohbet
2E819
ReplyDeletekocaeli telefonda kadınlarla sohbet
çorum yabancı görüntülü sohbet
uşak bedava sohbet siteleri
Tekirdağ Sesli Sohbet Uygulamaları
bitlis rastgele canlı sohbet
giresun sesli sohbet sesli chat
aydın en iyi görüntülü sohbet uygulamaları
Aksaray Yabancı Görüntülü Sohbet Uygulamaları
rastgele görüntülü sohbet ücretsiz
BBA2F
ReplyDeleteerzincan seslı sohbet sıtelerı
Istanbul Canli Sohbet Chat
Ağrı Ücretsiz Sohbet
Kilis Görüntülü Sohbet Kadınlarla
karaman mobil sohbet chat
ankara bedava sohbet odaları
yalova kızlarla rastgele sohbet
tokat görüntülü sohbet siteleri ücretsiz
aydın canlı sohbet et
731EF
ReplyDeleteKızılören
Ağın
Ovacık
Avcılar
Üsküdar
Nazimiye
Çelebi
Hozat
Otlukbeli
7F6F3
ReplyDeletebitget
telegram türk kripto kanalları
btcturk
güvenilir kripto para siteleri
gate io
bitexen
btcturk
huobi
kucoin
2667D
ReplyDeletetelegram kripto
kucoin
ilk kripto borsası
aax
en düşük komisyonlu kripto borsası
bitcoin nasıl kazanılır
mobil 4g proxy
binance referans kod
huobi
18205
ReplyDeleterastgele canlı sohbet
bitcoin ne zaman yükselir
papaya meyvesi
bybit
bitcoin hangi bankalarda var
huobi
binance referans kimliği
btcturk
probit
0D3BB
ReplyDeleteKuluncak
Bigadiç
Hacılar
Batman
Kilimli
Şırnak
Taraklı
Menteşe
Kapaklı
شركة تسليك مجاري بالدمام xLSgTjSatV
ReplyDeleteرقم مصلحة المجاري بالاحساء GPhn6FmV6h
ReplyDeleteشركة صيانة افران بالاحساء pVeRYyRnCV
ReplyDeleteشركة عزل اسطح بابها K1MbFQTCQg
ReplyDelete43571613A0
ReplyDeletetakipçi
3864108F2B
ReplyDeletedüşmeyen gerçek takipçi
شركة صيانة افران باحد رفيدة UEYB5BFrhB
ReplyDelete3130DD021F
ReplyDeletetiktok organik takipçi
beğeni satın al
fake takipçi
takipçi paketi
ucuz takipçi